The Nopali Administrator Application is used to manage database backups and restoration. Go to the 'Server' tab and look at the lower third of the panel.

To create an immediate backup, simply press the 'Create Backup' button. After selecting a save location for the backup, the backup system will create a package. Using this method of backing up, users will still be allowed to use the database, but the database will run more slowly. You may need to do this if you are transferring the database to a new computer, although in this case, it would probably be better to make a backup without any users connected.
The Nopali Server application will also allow you to automatically create backups once a day at a pre-set time. Press the 'Create backup automatically' checkbox to enable this function:

The default setting for automatic backups is set to 2 am. For this backup to be performed, the computer hosting the database should never go to sleep. Use the computer Energy Saver section of the System Preferences to make the sleep setting adjustments.
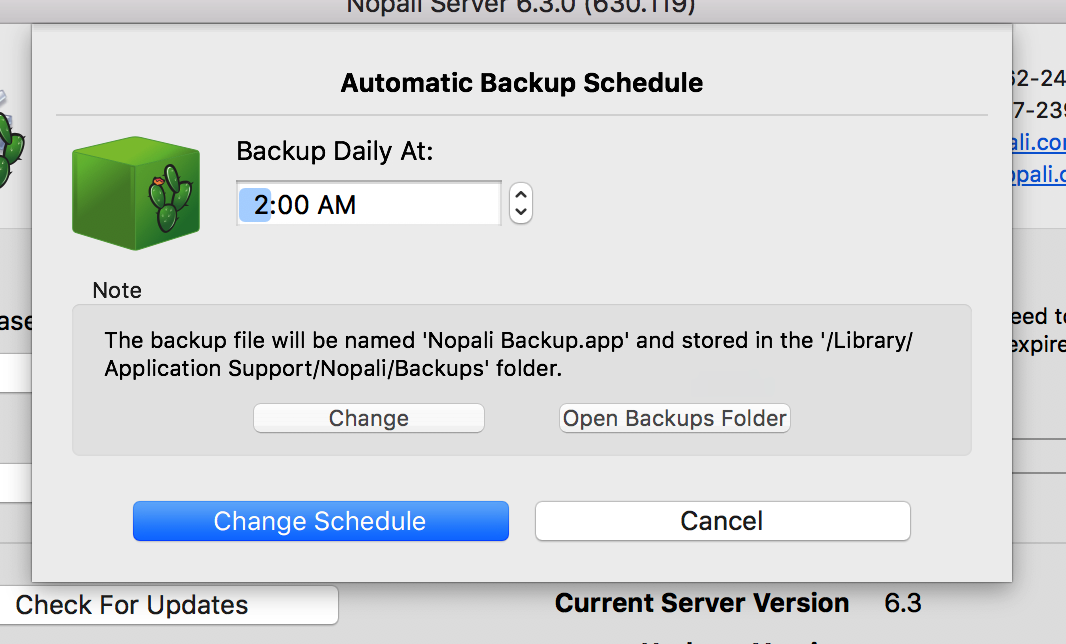
You can change the default backup settings and see where the backup copy is being kept by pressing the 'Change Schedule' button. A sheet with details of the scheduled backups will drop down:

The details sheet allows you to modify the triggered backups. Note that you must press the 'Change Schedule' button to save any modifications.
As you can see in the details sheet, the automatic backups are performed once daily. The backup package is saved to a fixed location ( the default being /Library/Application Support/Nopali/Backups/ ). You can change the location of the backup by pressing the 'Change' button in the note box. Each day, a snapshot of the previous day's database changes will be added to the existing backup package. It is your reponsibility to ensure that this new backup is saved to a different hard drive by using a dedicated backup program like Time Machine or an online backup service like Backblaze.
Nopali Admin will also allow you to send an email message after the automated backup process is completed. To set this up, press the button found next to 'Send Email'.
Whenever a backup of the database is performed, the end result is a backup package that is saved to the hard drive:

To restore the database from a backup package, you can either press the 'Restore From Backup' button on the Nopali Server panel and select the desired package to restore from. Or, you can simply double-click on the backup package itself. On more recent versions of macOS, double-clicking might not work, so just use the Nopali Server application to retore in this case.
To move the database to a new computer, you should follow these steps:
To restore from a Time Machine recovery, the process is slightly different. Time Machine will not backup the original database, but it will backup the Nopali Backup package. If you restore your computer using Time Machine, you will need to double-click on your Nopali Backup package or use Nopali Server to restore from the backup package.
Time Machine comes built-into Mac OS X. It is a fantastic program that will allow you to easily backup your computer and retrieve important files in the event of a hard drive failure. With regards to backing up Nopali using Time Machine, there are a few things to keep in mind:
As mentioned above, Nopali can create a backup file each day, when set properly. Time Machine can then be used to make a copy of this backup file to a nearby Time Capsule device. In order to have an offsite copy of the backup file, you can use one of many cloud-based services, such as Backblaze. You can go their websites for further information. You should keep in mind that some of those services (including Backblaze) will not backup the default location for Nopali Backups ('/Library/Application Support'). If you use such a service, you would need to change the backup location to one that the service does backup, typically somewhere in the Home Folder of a user account on your computer.